I have just bought the EXC!TE SNARE DRUM PRO and almost have made the DIY Piezo-Preamp. But I have few questions since I haven’t done stuff like this before. My question is in the form of a picture, see the picture below.
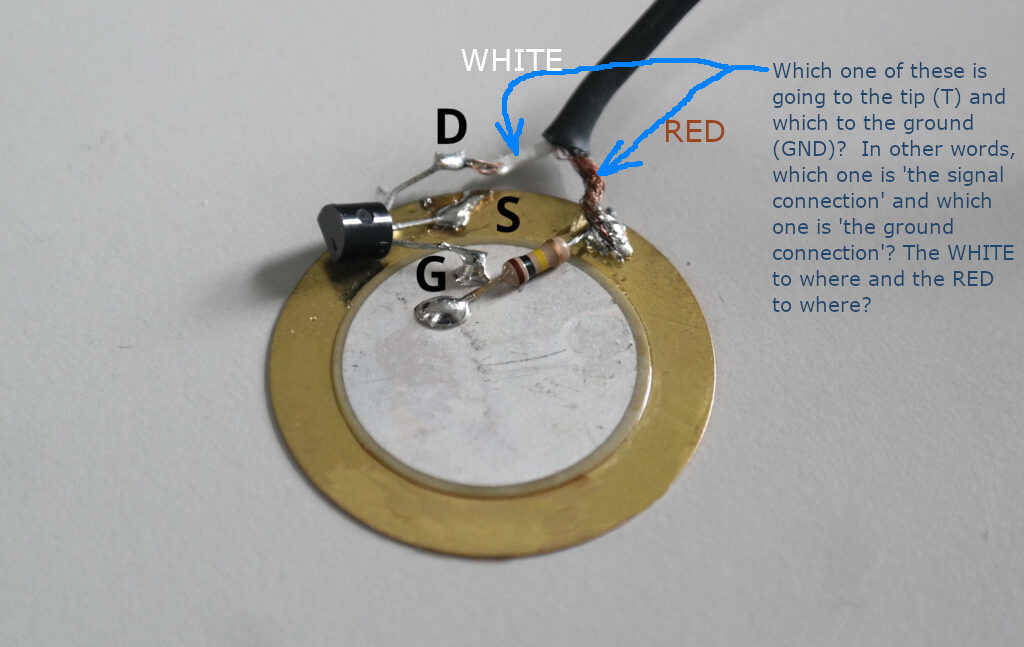
Which one of these is going to the tip (T) and which to the ground (GND)? In other words, which one is ‘the signal connection’ and which one is ‘the ground connection’? The WHITE goes to where and the RED goes to where?
The white wire is the signal and should go to the tip. The red wire is the copper shielding and should go to the ground.
I haven’t fully tested this on a Mac. There you have to trick the mic input to think it is original apple hardware. You can do so by additionally plugging an apple headset via a splitter. That’s what other people reported. On other systems it should work right away.
Hmm, ok… the weird thing is that I already got the whole thing working, even though I tried the wires attached both ways… I didn’t solder the wires to the jack yet, I used alligator clips. Is it somehow normal that it can work both ways? I mean… I switched the place of the wires and tried a recording and it worked both times. How could that be so?
Should those two wires (the white and the red) be somehow physically different? I mean, I only bought three meters of audio cable and cut it in half and used it as both wires.
(I have a laptop with Windows 10)
Thank you very much for your answer and all the best!
Do you notice a difference in signal quality? You pick up the signal with high impedance and high gain on the brass disk (directly to the internal mic input). But you probably loose all the bass response like that. So picking up the signal after the transistor lowers impedance and gives you more bass response. At least that’s what is to be expected.
Ground is connecting the brass base of the piezo disk with the shield/ground of the TR(R)S jack. TRS stands for Tip, Ring, Sleeve. Sleeve is the ground on TRS plugs/jacks. On TRRS plugs/jacks (the headset type) sleeve is the mic and ring 2 is the ground.
Well, yesterday when I was doing some test recordings, one of the solders came off (off the piezo disc). Today I tried to fix it, but I didn’t succeed and I also got another solder to come off. That is, now the two solders on the outer periphery of the piezo disc are not attached to the piezo disc. I tried many times to get both solders back on the piezo disc, but they no longer seem to “stick” at all.
Would you happen to have some good tips for a situation like this? How do I get the solders to stick to the piezo disc again?
The store where I bought these components for this project, there also seems to be a solder paste, flux gel, soldering acid, soldering flux and liquid medium-active flux…
The piezoelectric effect is achieved by crystals which are polarized by structural alignment which happens when a strong (several Kilovolts) electric field is induced, typically combined with heat. Heat allows these crystals to polarize easier under the effect of the electric field, but if only heat is applied the crystals will depolarize. This means the piezoelectric effect of a piezo speaker/mic will be weakened or gone when too much heat is applied to it.
Therefore the goal, when soldering the wires, is to apply as little as possible heat for the shortest amount of time to the piezo, but still sufficient heat for the solder alloy to form a bond with the brass disk and the silver coating of the ceramic disk. While the silver coating of the ceramic disk is quite easy to solder to, the brass material of the base is difficult to bond to for the solder alloy. Exposure temperature and time form a trade-off (low temperatures force you to heat longer until the solder becomes liquid and can bond). I tend to work with a bit higher temperatures (but never above 350° C) but then can let the finished joint cool off earlier.
The technique I find most effective is to take a cutter knife and scratch a pattern in the brass plate on the very edge. I then use a flux pen or syringe to add some flux to that pattern. Then I add a good amount of solder to the wire and then heat the scratched and fluxed spot of the piezo. I am using a soldering tip that lets me maximize the contact area for a rapid heat transfer.
I would like to build this also but for a 6.3 TRS and there is a problem the mentioned JFET is nowhere to be found. Could you update the part list. I would like to feed it into a VCA+Filter. Cant Afford an EuroRack case right now so a KOMA fieldkit will have to do.
The problem of that particular JFET being out of production still stands. You’re correct this is not a line level signal, will read up. I just was hoping you could hint me in the direction how to convert it into a line or CV signal because that would open the door for a whole new level of crazy sounds.
Regarding the availability of the transistor, a quick search found a NTE457 at TME
This kind of N-Channel JFET transistor 25V 10mA can be found in different packages, SOT-23-3 seems the most common. Maybe a bit harder to solder by hand, but very possible. N-Channel JFET Transistors 25V 10mA at Mouser
Ok thanks, I’ve been searching for alternatives for the original 2N5457 you mentioned because that is out of supply and there was quite some discussion about what to use.
Hello @Dimitri, here are some transistors that worked so far:
NTE457
2N5457
MMBFJ201 (small SMD transistor - should have the best characteristics)
J201 (bigger version but not so easy to get, or expensive)
These may work as well, but are untested:
2N5458
J112
J113
Not being a JFET expert – I think the most important characteristics of the N-Channel JFET for our circuit is VgsOff, VgsOn and Id. Where Vgs values are better the closer to zero and Ids should be as large as possible.
Some time ago I found a nice comparison chart from where I picked the list above, but I can’t find it again. Here is a blog post from somebody researching the same question (scroll down for a comparison chart).
Instead of the power from the microphone port of a computer, you can of course also use a 3V battery, e.g. a coin cell (or two). You need a very clean power source. 5V from USB will be very noisy but a 5V power bank is fine in most cases. For power banks it depends of the frequency of the internal switching regulator, this switching frequency should be high enough to be out of the hearing range.